Have you ever hosted a site with Hostinger? If you are a beginner, it might seem difficult to create a website, given the use of sophisticated coding skills often used to build one. But this blog will take you through some simple steps to help you install WordPress on Hostinger. We will discuss some tools that are easy to use for everyone, irrespective of your expertise in WordPress. Hostinger is a globally recognized platform for web hosting that makes creating websites easy and accessible. Even beginners can make their own websites by following these step-by-step instructions.
But first, let us learn about WordPress.
Table of Contents
What is WordPress?
WordPress is an easy-to-use, free website construction tool. Think of it as an open-source, free toolkit that anybody can use to build and maintain a website, that too without any technical expertise. Adding text, photos, videos, and other content becomes simple with WordPress. It has a variety of themes that let you alter the layout, as well as plugins to add features like contact forms to your websites. WordPress is a popular choice for beginners and experts and can be used to create everything from simple blogs to intricate web stores.
Method 1: Step-by-step Guide to Installing WordPress on Hostinger WordPress Hosting
While WordPress is free to use, it requires a hosting service to store website data and files. Hostinger offers different hosting plans that start from just ₹149.00/month. One can also use the exclusive Hostinger coupon code OC7 for some amazing deals on Hostinger. Installing WordPress on Hostinger is a rather simple process. If you haven’t purchased hosting yet, you may consider Hostinger WordPress hosting to streamline your WordPress setup using a one-click installer. The procedures for installing WordPress on your Hostinger hosting account are as follows.
Step 1: Visit the official Hostinger website.
You can start by simply searching Hostinger on Google or clicking on this link: https://www.hostinger.in/
Step 2: Select your preferred Hostinger web hosting plan.
Hostinger offers different web hosting plans, such as shared, cloud, WordPress hosting, etc. You may choose from different hostinger web hosting plans by comparing their offerings and price on the website. Check the image below to compare the Premium, Business and Cloud Startup plans.
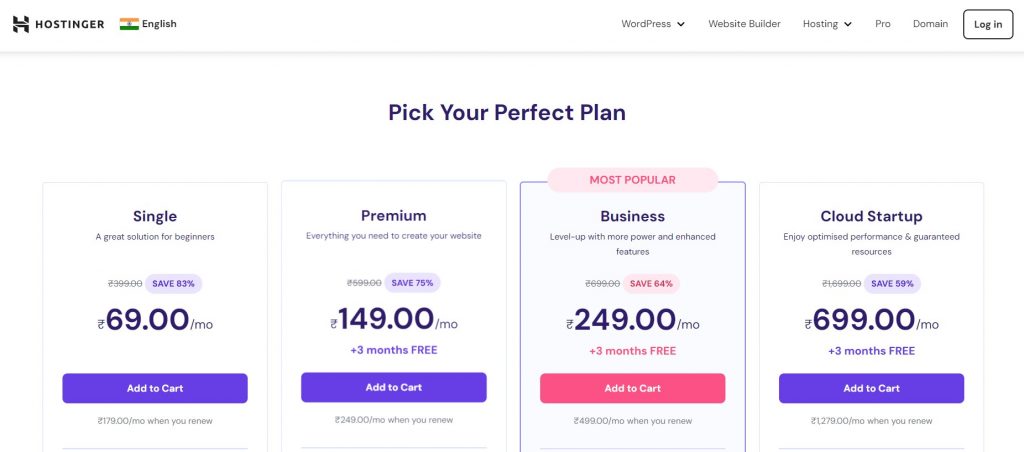
The WordPress premium plan costs just 149 rupees per month. Here are some other features of these different Hostinger web hosting plans:
- Premium Plan: A free domain name can be used to host 100 websites. Other benefits include free domain registration, free authentic website migration, and free email.
- Business Plan: Besides all the above features, you will also get a free CDN and basic WooCommerce Optimisation.
- Cloud Startup: One can host 300 websites and get all the features of Single and Premium plans, plus a dedicated IP address and priority support.
Select a plan you prefer to start the checkout process and click the “Add to Cart” button.
Step 3: Register with Hostinger and finish your transaction
You will then be prompted to the billing section. Opt for the 48-month (4-year) billing cycle for maximum savings.
All you need to do is create an account with Hostinger and enter your email address. To simplify things, you don’t need to register for a new login; you can sign in using your current Google or Facebook account.
Next, swipe down your screen to select a payment option. Hostinger accepts several payment options, including PayPal, CoinGate (a cryptocurrency), Google Pay, and credit cards.
Step 4: Install WordPress on Hostinger.
Once you’ve paid for your hosting, the next step is installing WordPress. So, the very first step is to access Hostinger’s hPanel, where you’ll locate the hosting account you’ve recently purchased. Use the username and password you’ve just set up, and also refer to the email confirmation that you received at the time of the purchase.
Here’s what this will look like
As depicted above, you’ll receive a complimentary domain upon purchasing the WordPress Premium plan. Click on “Claim domain” to obtain your free domain. Make sure to enter your information, including your name, address, email, etc., to complete the domain registration procedure.
Once you have claimed your domain, you need to set up your hosting account. Click on the setup option to see your current hosting plan. The onboarding process will then start. First, it will prompt you to select your website type. Make your selection and proceed by clicking “Next.”
In the next step, you will determine whether you prefer to construct your site using the WordPress or Hostinger website builder method. Simply choose “WordPress” and proceed.
Next, you must enter your WordPress credentials. Remember these credentials for future logins, as they are required every time you log into WordPress as an admin.
The next step is to add plugins. You may choose to add them or skip the step altogether.
Then, pick a free theme for your website. Here are some free themes to choose from
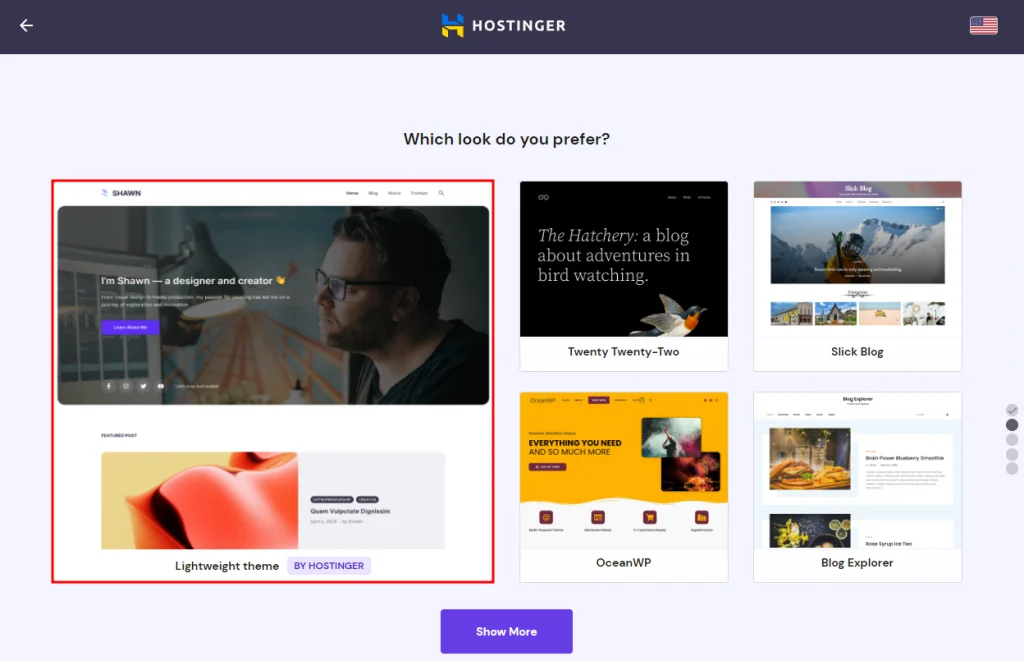
As shown above, you can select the layout that suits your preference or bypass this step.
In the next stage, your domain details will be displayed. If your domain is registered with Hostinger, select it; otherwise, you can use an existing domain.
In the last step, Hostinger will show you some important details. This is what it will look like.
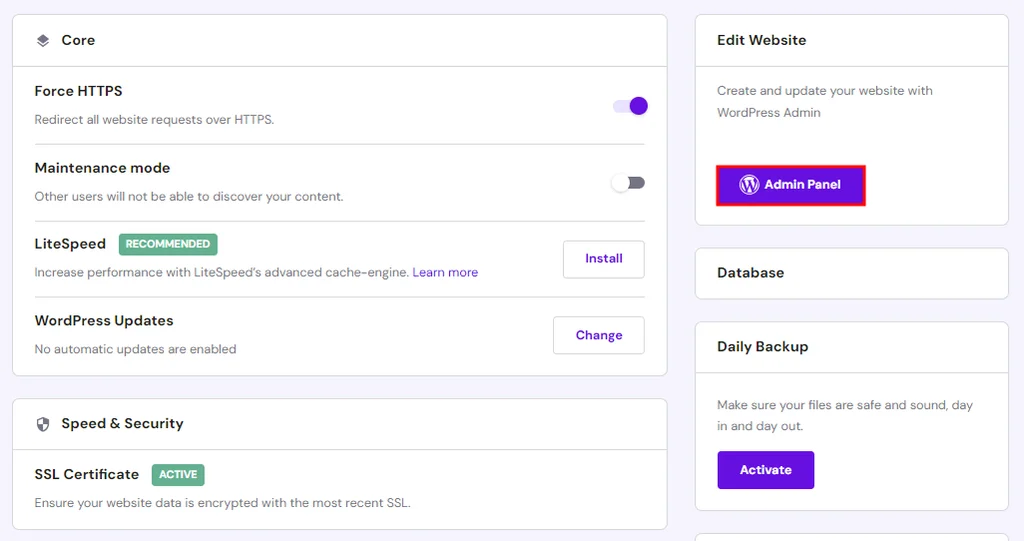
Click on “Finish setup,” and WordPress will be automatically installed on your chosen domain. A free SSL certificate will also be installed simultaneously.
Within a minute, your setup will be done.
Now, just open your website and start blogging.
If you cannot locate the SSL installed on your domain, you can go to the SSL section within Hostinger and install it manually. Here’s what it will look like:
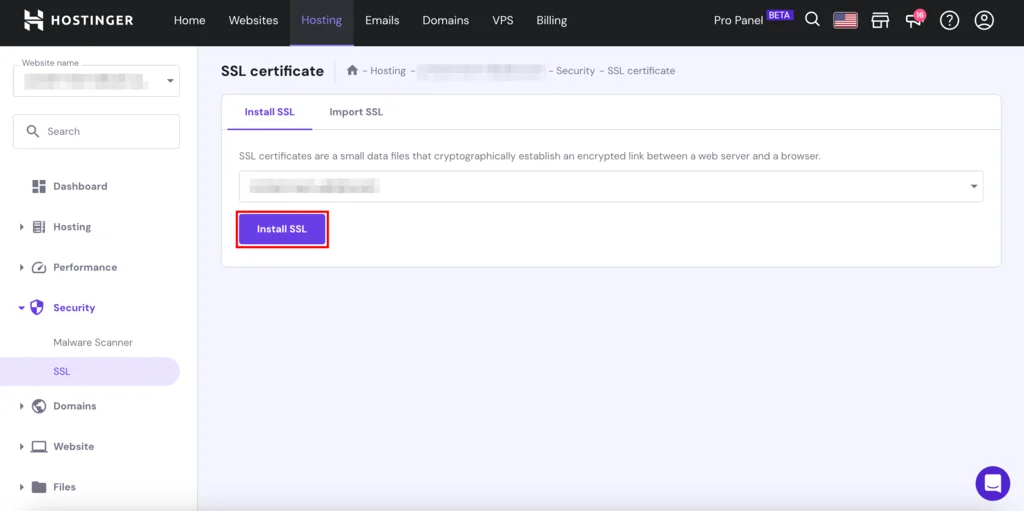
This explains the process of installing WordPress on Hostinger. Isn’t it simple and uncomplicated? Now, you’re all set to design and craft your WordPress website.
Method 2: How to Install WordPress on Hostinger Shared Hosting via Auto Installer
The most popular method of installing WordPress on Hostinger is shared hosting. Unlike the first method, which offers a one-click setup benefit, this quick method is a bit complex, but the best part is that it is equally beginner-friendly.
Step 1: Signup/Login to Hostinger Account
As discussed previously, the first step is to complete the Hostinger shared hosting purchasing procedure, look for shared plans, make the payment and then log in.
Step 2: Find Auto Installer
Once you log in, you will see the details of your configured hosting and domain name on the dashboard. Select the “Manage” button, located under the hosting section.
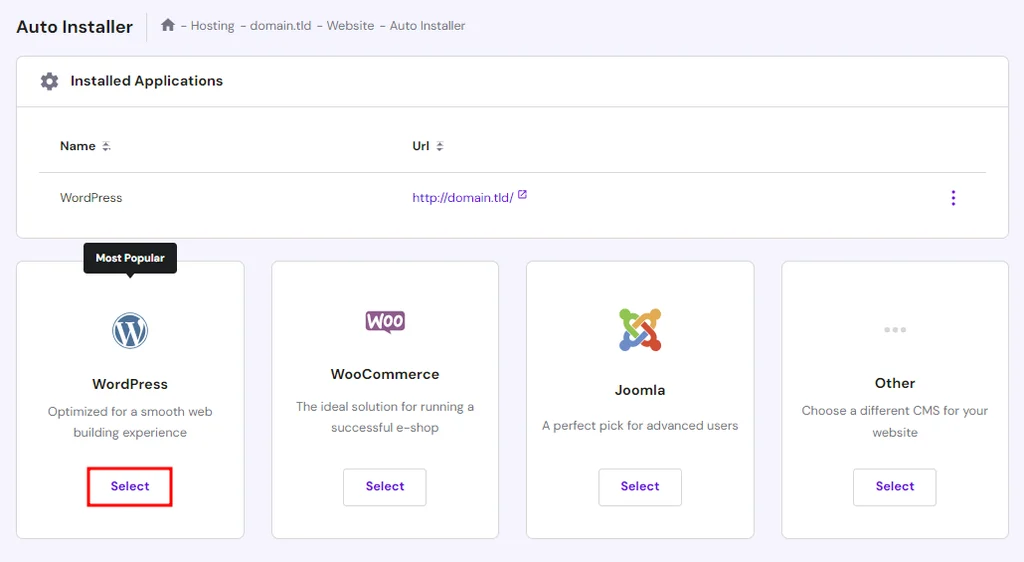
This will allow you to navigate inside your hosting hPanel. Towards the left side, under the Website tab, find the “Auto Installer” option.
Step 3: Choose WordPress CMS and Start the Installation
Inside Auto Installer, you will find many CMS options. Ensure to tap on the select button under the WordPress CMS.
Once you select WordPress, you have to put in the following credentials:
- Website Title
- User name and password for Admin
- Admin email
- Preferable language
- The version of the WordPress (Please select the latest WP version)
Once you have completed the WordPress installation form, tap on the “Install button.” This will allow you to install WordPress through the Hostinger Auto Installer.
Step 4: Access The Admin Dashboard
Once you complete the installation, you can access the WordPress dashboard by going to WordPress, selecting the Overview tab from the left sidebar, and clicking on the “Edit Website” Button.
Pro tip: Add wp-admin after your site URL to access WordPress quickly. Example: https://yoursite.com/wp-admin/
After installing WordPress, what should you do?
Now that you have finished making your website, you can begin working on it by logging into your WordPress dashboard and adding themes, uploading plugins, publishing content, and doing much more.
Remember to check out these helpful WordPress tutorials if you need assistance setting up your blog:
- How to Install Hubspot-Recommended Themes in WordPress
- WPBeginner’s Guide to Installing Plugins in WordPress
- Important settings following WordPress installation via WPBeginner
- How to Integrate WordPress with Google Search Console by WPMU DEV
Why use WordPress?
Here are some reasons for you to opt for WordPress:
- Free to Use: WordPress itself is completely free. Startup costs for creating a website are negligible.
- Easy to Learn: Other website builders are not like WordPress. WordPress is still a viable tool for building stunning, expert websites, even if you’ve never written a line of code before.
- Search Engine: WordPress websites usually rank highly in search results since the platform was created with search engines like Google in mind. This means that more individuals will probably locate your website.
- Extremely Adjustable: WordPress makes it simple for you to alter the appearance and structure of your website.
- Future Validation: You have a fantastic post idea but wish to submit it later? WordPress allows you to schedule pages and articles ahead of time, allowing you to organize your material and publish it at the ideal moment.
- Organized Content: WordPress makes it simple to divide large amounts of content into several easily readable pages. As a result, visitors will find it simpler to locate the information they need.
Conclusion
Finally, while building a website may appear difficult, it’s rather simple when using WordPress with Hostinger. Thanks to its user-friendly interface, anyone can make a website for free and with ease with WordPress. A web hosting provider called Hostinger Website Builder gives your website a place to reside online. Now that you know the process of installing WordPress on Hostinger, you may start creating your website, adding themes, plugins, and content to it, and building a stronger presence in the online world.


